foodperson.com

You are what you eat

foodperson.com header image 1

Jack-o-lanterns provide seeds for snacking

October 31st, 2008 · Food preparation

This year’s jack-o-lanterns are scared and scary, but both were filled with many, many pumpkin seeds. If you haven’t carved yours yet, there’s still time to do so and to roast the seeds for snacking. Another kind of free food (if you’re making a jack-o-landtern, anyway)!

The way we do it around here is to rinse the seeds and remove strings; soak for a while it salt water; and roast in a single layer on a pan at 350 or 375 until crisp, about 15-20 minutes. Or, if we’re feeling really lazy, we’ll just toss the wet seeds onto a pan, sprinkle salt on them and roast.

If you’d like something a little more detailed or inventive, try these options:

Do you roast pumpkin seeds? What’s your method?

→ 1 CommentTags:·

Mushrooms seem to be everywhere

October 29th, 2008 · General, local food

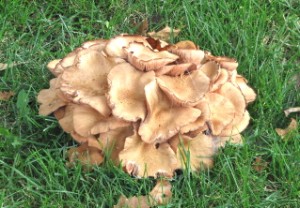
If you’re looking for mushroom eating and cooking advice, you’d better look elsewhere. I could take or leave mushrooms as food. But learning I had chanterelles in my front yard earlier this year raised my mushroom consciousness, so I thought I’d share with you examples of mushrooms available around my neighborhood, all shot since Sept. 22, that are probably edible.

This one (about 1 foot across) was under a sycamore tree.

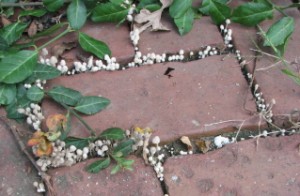
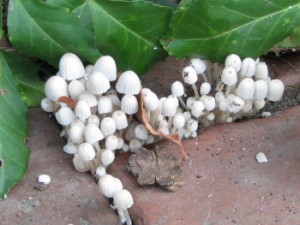
These were in the cracks between sidewalk paving bricks:

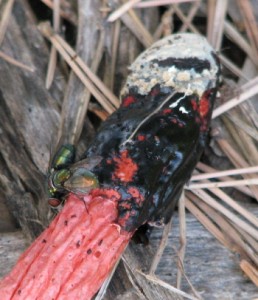
They were very cute, although Kansas Mycologocial Society prez Bob Bruce said they probably weren’t worth fooling with. Next is a somewhat desiccated version of a stinkhorn mushroom, found near the city pool. (I didn’t have my camera with me while it was still, um, tumescent. (See the fly on it? Goes with the territory, I hear.) Bob said they’re edible, but he wouldn’t want to eat them.

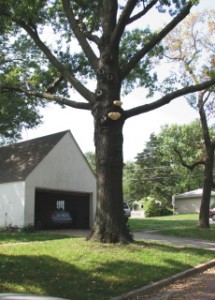
But the real prize mushroom I found wasn’t on the ground but 15 or more feet in the air. See the cream-colored lumps up there where the branches start?

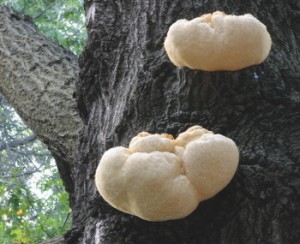
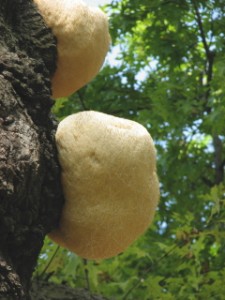
Take a closer look:

This find was so exciting that a mushroom fan reportedly took a ladder and saw and harvested at least one of them. It was big enough that he couldn’t hang onto it and nearly dropped it on his confederate.

One last report, minus photo. There are some gray mushrooms in one spot that recur from year to year and seem to dry in place, turning black. They were up a couple of weeks ago. My dog likes to eat them. Of course, she isn’t what you’d call a picky eater.

Anyway, now that the temperatures are falling, I assume we’re largely done with wild mushroom “fruiting” for the year. What nonmycologist knew that wild mushrooms grow in the city?

→ 6 CommentsTags:··

Apples, pears join quinces for fall preserves

October 28th, 2008 · Food preparation, local food, recipes

Remember the ornamental quinces? Well, they’re all cooked up and ready to eat, with a little help from apples (local), pears (local and free) and sugar. I got some ideas from Joy of Cooking
and adopted the name of one recipe there to produce these sweet-tart and pretty preserves. Or maybe it’s jam. Or conserve. You decide.

Harvest Preserves

  • 1 1/4 pounds ripe ornamental quince
  • 1/2 orange, washed and halved
  • 2 1/4 cups water
  • 2 1/2 pounds other fall fruit, peeled, quartered and cored; I had about 2/3 apples and 1/3 pears
  • 2 cups sugar
  1. Wash and halve quinces and place in heavy, nonreactive pot. (I used enameled iron.) Add orange and water.
  2. Place over medium-high heat, bring to boil, then simmer until quinces are soft. (I believe it was only 15-20 minutes, but I failed to write it down. Sorry.)
  3. Place strainer over bowl or measuring cup, and pour mixture into it. Press soft flesh through. The skin is very thin and soft and some of it may pass through the strainer, too. Don’t worry about getting all the flesh. Discard the seeds, orange and retained skin, and return the quince liquid to the pan.
  4. Add apples and pears, and bring to a boil. Add sugar, and bring to a boil again.
  5. Simmer until fruits are soft, and syrup is reduced to desired thickness. (See note.) Stir often to assure no sticking or burning. Mash fruits with potato masher.
  6. At this stage, you can cool and refrigerate it if you want that much around. Or, you can transfer mixture to hot, sterile jars, leaving 1/4-inch headspace. (I left a little more than that. So sue me.) Wipe rims clean. Add lids and rings, and process 5 minutes in boiling water bath, or according to the chart at the link above. Makes 2 pints plus a little leftover.

NOTE: Quince, including ornamental, has a fair amount of pectin in or under the skin, and mixture will thicken more after cooling. You can read more details about checking to see if it’s ready at the National Center for Home Food Preservation.

Furthermore…

I’ve learned more about ornamental quince than I ever imagined, including that they are highly unreliable as to fruiting, so I don’t know if I’ll ever make this again. But, if you have some bushes with those little fruits, which ripen from green to yellow if you’re patient, now you have some way to use them!

I assume that these preserves got their pretty pink color from the quinces, since regular quinces turn pink/red when cooked.

Meanwhile, I haven’t yet tried to pawn a jar off on the owner of the quince bushes. When I got the fruit she said, “No, no! You don’t need to give me anything!” I’m not sure whether that meant she and her husband aren’t jelly-eaters or if she was being gracious. (She’s always gracious, actually.)

By the way, shortly after I made this I came across some regular quinces at the supermarket, hauled in from I’m-not-sure-where. They were about quadruple the size of these, looking like lumpy oversized pears. Believe me, there would be no confusing the two!

→ 4 CommentsTags:···

Roundup: Food and books get our attention

October 27th, 2008 · Books, Roundup

This roundup has a definite Kansas City and book bent.


On the menu. Maybe you remember seeing photos from the book Hungry Planet: What the World Eats on the Time magazine website. Now you can see the photos in person at the Kansas City Public Library through Jan. 18. (KC Public Library)

Food maven from Kansas. The noteworthy and so-soon-obscure food writer Clementine Paddleford gets her due in new biography, Hometown Appetites: The Story of Clementine Paddleford, the Forgotten Food Writer Who Chronicled How America Ate. (Washington Post)

Speaking of food. William Tuttle, author of World Peace Diet: Eating for Spiritual Health and Social Harmony, will speak on Thursday, November 13, 2008, at 4:30 p.m. at Johnson County Community College. He will talk about where our food comes from and how it may be harming us physically and spiritually. He will also give suggestions for positive changes. The talk is part of the college’s sustainability lecture series and is open to the public, although faculty and staff are asked to register. (JCCC)

Still nurturing AgroDefense idea. Kansas’ leaders are still working hard to get the most dangerous agriculture pathogens moved to our state. Oh boy? (KC Star) And Johnson County could get a piece of the action, too. (KC Star)

Food short in farm country. Kansas City isn’t the only place with the problem, but an NPR feature spells out the problem. (NPR)

Cold toes alert. The Barefoot Contessa, Ina Garten, will be speaking in Kansas City this week on her book tour for Barefoot Contessa Back to Basics: Fabulous Flavor from Simple Ingredients which is officially released tomorrow, and she talks with the Star in advance. I think she’ll be wanting her shoes while in town. (KC Star)

→ No CommentsTags:·

Braising makes for succulent grass-fed beef

October 22nd, 2008 · Food preparation, local food, recipes

If you’ve hesitated to try grass-fed beef because you’ve heard it’s tough, you might reconsider. Just be sure to braise it. “Low and slow” are the watchwords for grass-fed beef, such as the roast I got from my friends’ cattle. And braising is a nice way to cook on a chilly, rainy day.

Can you say comfort food? Your braised beef will fill the house with a lovely fragrance, provide moist warmth for rising if you want to bake bread too, and it warm you from the inside out.

Here’s a simple preparation that’s wonderfully flavorful. And there’s a bonus: a way to use turnips that doesn’t make me turn up my nose!

Braised grass-fed beef with vegetables

  • 2 tablespoons olive oil
  • 1 beef chuck roast, about 3 pounds
  • Salt & pepper
  • 1-2 cloves garlic, peeled and trimmed
  • 1/2 onion, trimmed
  • 1 carrot, peeled and sliced
  • 1 celery rib or 1/8 teaspoon celery seed
  • 2 cups dry red wine
  • Water
  • 3 sprigs parsley
  • 5 sprigs thyme, or 1/2 teaspoon dry
  • 1 bay leaf
  • 4 small new potatoes (about 1 1/2 inches in diameter)
  • 4 small white turnips, trimmed (you can cook the greens, too, if you want)
  1. Heat oil in heavy pot over medium-high heat. (I like enameled cast iron, and the pot should be only a little bigger than the beef.) Dry beef and generously sprinkle with salt and pepper. When oil is very hot, sear beef on all sides, 2-3 minutes a side. Expect some spatter!
  2. Set pan off heat and spoon off fat. Return pot to heat, and add garlic, onion, carrot and wine, then add enough water so that the liquid comes at least half way up the side of the beef. Add parsley, thyme and bay leaf. Cover.
  3. Bring liquid to a boil, then reduce heat and simmer, covered, about an hour. Turn beef over and simmer 1 1/2 hours.
  4. Add potatoes and turnips. Simmer 30 minutes more, or until vegetables and beef are very tender. Let beef sit 15 minutes or so before serving.

Bonus dishes

At this stage, you can call it done and serve the beef and vegetables however you like. Here’s what I recommend to make the most of it. First, you make a nice vegetable mash.

  1. Transfer meat to serving tray or cutting board.
  2. Pour the rest through strainer into fat separator. (I guess you can tell I love that thing!)
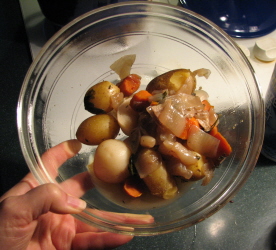
  3. Remove herbs from the strainer, then transfer carrots, potatoes and turnips to a bowl, and mash with a little bit of the broth for added flavor. Check and adjust seasonings, and serve. (As you can see, I also cooked some tender green beans from Rolling Prairie on the side.)

Before

After

Ready to eat

For a double bonus: Return the broth to the pan, minus the fat, and use it, with some added water and any leftover beef, as the basis for a really rich and flavorful vegetable beef soup. Just add your favorite vegetables and maybe a few noodles, and cook till tender. Double yum.

Now, how’s that for comfort food?

→ 3 CommentsTags:···

Ugly’s only skin deep when it comes to apples

October 20th, 2008 · Farmers markets, Food selection, local food

Would you pay more for an apple if it was produced with fewer chemicals? Probably not if it’s ugly, according to a paper by Chengyan Yue, Helen H. Jensen and others at Iowa State University. But maybe you’d reconsider if you knew that ugly apples can taste great. Take this apple, for instance.

From the side

From the bottom

That ugly apple came from my gigantic haul from the Lawrence Farmers Market recently, and I’m here to tell you it was delicious: crisp, juicy, flavorful. I, an apple culture ignoramus with access to the World Wide Web, have diagnosed it and its fellows as a victim of sooty blot and flyspeck fungi, as illustrated here and at Ohio State University Extension. Accordingto Iowa State Extension, “Sooty blotch and flyspeck fungi harm only the appearance of an apple, not its taste.” Indeed.

Sure, pretty is appealing. But when you get fresh, tree-ripened local apples with a little smudge, you’ll see that the beauty is in the eating. Again, consider this same apple.

First, polished:

You can tell it’s the same apple by the little bruise indention at the shoulder on the right. All it took to eliminate the blotches was rubbing with a kitchen towel.

Before I cut into it, though, I did notice one tell-tale mark that ugly apple newbies might not notice:

This photo, besides revealing a little flyspeck fungus (doesn’t that name sound appetizing?), shows a little pinhole. That, plus the extra-ugly apple bottom, hinted that a worm may have had a sample. Still this is not cause for alarm! Witness the apple, halved:
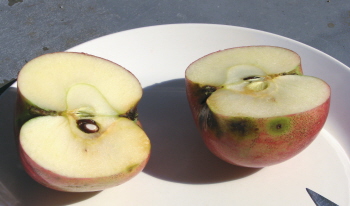

When quartered, however, we can see where a worm has had it’s way with a little bit of the core.
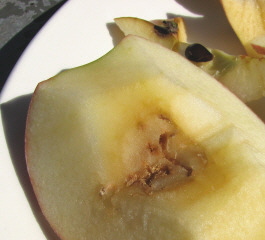

That’s just one quarter. The other three were perfect, do you hear me? Look at this:

After trimming away the wormy bit, I still had this much apple to eat. (Core and wormy bit in front, good stuff in back.) It only took a minute or two before the core was all I had left.

I guess that’s why, even though I’ve only made one apple crisp and one tart (so far) from my 20-pound purchase, my apple stash keeps shrinking. I just keep eating the darned things and enjoying them all the more for knowing that the farmer who grew them prefers using fewer chemicals.

I guess when other people discover ugly apples taste wonderful, they just might bid the price up. In the meantime, I’ll just eat them and smile.

→ 7 CommentsTags:··