It’s funny the kitchen tasks you take for granted. My friend and her souffles, for example, or me and my grapefruits sections (or my orange sections—same idea). But this weekend I took a salad that included grapefruit sections to a gathering, and Ann recalled the tedious task from her childhood of removing the membranes from grapefruit sections. She requested a tutorial on how to do it easily, so here it is.
How to: Membrane-free citrus sections
1. First slice off top an bottom of the fruit with a knife, aiming to cut through the peel and just down to the outer membranes. 
2. Next, cut off the outer peel in the same way… 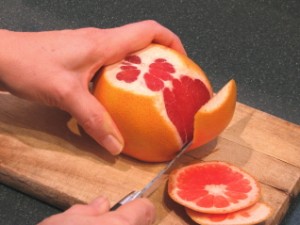
Until you have yourself a naked grapefruit. 
3. Now, insert your knife blade between the flesh of one section and its outer membrane, and gently cut to the “core” of the fruit. 
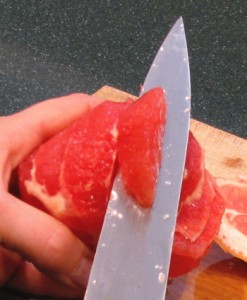
4. When the blade hits the relatively hard center, rotate the blade toward the other side of the section. You might need to saw just a bit to start, but the section will lift quite easily out of its last bit of “casing” at this stage. 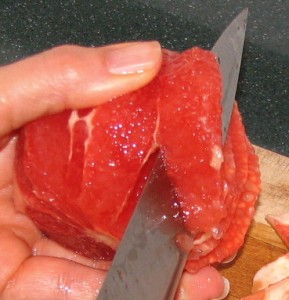
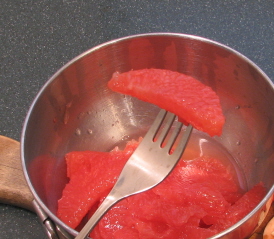
Repeat the process with each section of the fruit. You might want to work over a bowl to catch the juices.
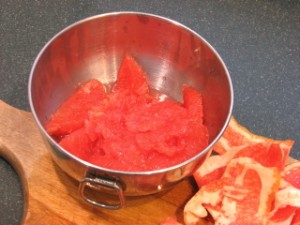
5. When you’re done, you have a bowl full of sections and juice and a little flower of grapefruit membranes.
Footnotes
I might add that this process is much easier than taking pictures of yourself while doing it, even with the benefit of a tripod and a camera timer. Thus, the focus isn’t always ideal, but, hopefully, you can see what’s going on.
By the way, if you work quickly, you might wind up with a little grapefruit flesh clinging to some of those membranes. If so, just go back through after you’ve removed all the sections and lift/scrape off the remaining fruit.
Grapefruit is in season and is wonderfully juicy. Try it for a change for nice flavor and color in salads or desserts. Having your sections without the membranes isn’t necessary (and, in fact, provides less fiber), but preparing them this way certainly highlights their color and makes for a more elegrant presentation.



Ann // Dec 15, 2008 at 9:58 am
How wonderful! All those Thanksgiving and Christmas grapefruit salads would have been so simple had I only known. Thanks, Janet.
Great tutorial w/pics! Thank you for posting this.
Cheers,
KristenM
Cindy // Jul 22, 2010 at 8:27 pm
How I made it this far in life without knowing this skill, I will never know! I just had a bowl full of sections as a treat…so much easier than prying them out of the grapefruit halves one by one!! Excellent tutorial and great pics…thank you!
Janet Majure // Jul 23, 2010 at 9:54 am
Thanks, Cindy & FoodRenegade. Glad to be of help!
Ruby Red Grapefruit: Jewels in my Kitchen // Nov 21, 2010 at 10:03 pm
[…] help sectioning a grapefruit? Here’s a great step by step pictorial that is really […]
Avocado, Grapefruit and Roasted Mushroom Spinach Salad « The Purple Mixer // Sep 26, 2011 at 7:17 pm
[…] you should have one clean section of fruit. Continue to peel sections from the membrane. Click here for detailed step-by-step photos and instructions of how to section grapefruit. Share […]
Succulent Summer Watermelon Salad | Semperviva Yoga // Jul 17, 2012 at 5:31 am
[…] 2 large grapefruits – sectioned (Here is how to section a grapefruit) […]
kitty // Dec 11, 2013 at 10:14 am
my husband says “You might want to work over a bowl? You’d be better off working over the bathtub.”
Janet Majure // Dec 11, 2013 at 1:34 pm
You must have some very juicy grapefruit! :-)
Easy Peeling Hard Cooked Eggs | Rosemary's Sage // Jan 15, 2015 at 7:53 am
[…] addition of grapefruit sections. (Thanks to Beverly’s mom, Betty, I had one last, amazing grapefruit to section.) To keep the eggs pretty, I tucked the egg slices into the salad after plating. When I make it […]