foodperson.com

You are what you eat

foodperson.com header image 1

Almost Peches cardinal are almost as good

July 11th, 2008 · local food, recipes

Sometimes I think we American cooks get too caught up in what’s fashionable to prepare rather than focusing on what’s divine to eat. Consider peches cardinal. Sort of like Peach Melba without the ice cream, peches cardinal combines two divine fruits—ripe peaches and raspberries—prepared to underscore their savor and highlighted with a touch of vanilla and sugar.

The thought of peches cardinal, in one of those too-rare taste memories, burst into my head this week when I found myself in possession of local raspberries and tree-ripened peaches. I had to have the dish again.

Now, it’s been ages since I made peches cardinal, but I can vividly recall the exhilaration of tasting the dish the first time. The sauce (of pureed, seeded and sweetened berries) screamed raspberry, and the cardinal color truly was brilliant next to the tender, vanilla-tinged poached peach flesh. Ah. Heaven.

This week, though, I had only myself to cook for, and I wanted that dessert ASAP, never mind the chilling and all that. So I created Almost peches cardinal. (I do wish some French scholar would explain to me why there’s no “s” on the end of “cardinal,” but that’s neither here nor there.)

Almost peches cardinal (1 serving)

  • 1 large or 2 small ripe peaches
  • 2 tablespoons sugar, divided
  • 1/8 teaspoon vanilla extract
  • 3/4 cup raspberries
  • Mint leaves for garnish (optional)
  1. Slice peach(es) in bowl and sprinkle with 1 tablespoon sugar and the vanilla. Stir to combine.
  2. Place raspberries and 1 tablespoon sugar in chinois or sieve. Press through to puree berries and dissolve the sugar.
  3. Pour raspberry sauce over peaches. Garnish with mint if desired. Admire the beauty. Dig in.

Mine was delicious, although not quite to the standard of the memory for two main reasons. First, I jumped the gun; the peaches needed a day on the counter to soften up. Second, the chinois allowed seeds through, mostly because I was determined not to leave any flesh behind. (I shouldn’t have tried so hard, because I wound up scraping the seeds and whatnot off the pestle and ate that, too.) Next time, I may use the chinois and then put the results through a sieve.

If you aren’t in a hurry, though, I heartily recommend the original recipe, from Mastering the Art of French Cooking, Volume 1. (The link goes to the 40th anniversary edition. I have the 1983 edition, well-used. I should note I’ve had a gas stove for about 20 years.) I just may have to acquire more berries and fruit and do it properly.

Peches Cardinal: Poached peaches with raspberry puree (10 servings)

  • 6 cups water
  • 2 1/4 cups granulated sugar
  • 2 tablespoons vanilla extract or 1 vanilla bean
  • 12-inch saucepan

Simmer the water, sugar and vanilla extract or bean in the saucepan and stir until sugar has dissolved.

  • 10 firm, ripe, unblemished, fresh peaches about 2 1/2 inches in diameter
  • A slotted spoon
  • A cake rack
  • A serving dish 2 inches deep

Add the unpeeled peaches to the simmering syrup. Bring again to the simmer, then maintain at just below the simmer for 8 minutes. Remove pan from heat and let peaches cool in syrup for 20 minutes. (Syrup may be used again for poaching other fruits.) Drain peaches on rack; peel while still warm, and arrange in serving dish. Chill.

  • 1 quart fresh raspberries and 1 1/4 cups granulated sugar OR
  • 1 1/2 lbs. frozen raspberries, thawed and well drained, and 2/3 cup sugar
  • An electric blender (or electric beater)

Force the raspberries through a sieve and place the puree in the jar of an electric blender along with the sugar. Cover and blend at top speed for 2 to 3 minutes, or until puree is thick and sugar has dissolved completely. Chill. (Or beat puree and sugar about 10 minutes with an electric beater.)

  • Optional: fresh mint leaves for garnish

When both puree and peaches are chilled, pour the puree over the peaches and return to refrigerator until serving time. Decorate with optional fresh mint leaves.

→ 5 CommentsTags:···

Roundup: Prices, pantries, programs

July 8th, 2008 · Food in the news, Roundup

I think we’re getting inured to unsafe food, as the salmonella poisoning seems to barely register on the news radar this week, locally or nationally. Here’s some of what is in the local news, food-wise:

Lunch ticket gets punched. Topeka school meal planners wrangle with higher food costs. (Topeka Capitol-Journal) Lawrence schools, too. (LJ World)

New assistant ag dean at K-State. A native daughter who grew up on a farm and went on to study agribusiness is named to K-State post. We’ll hope as head of academic programs she has some interest in sustainable farming methods. (K-State)(Her Purdue bio)

Cupboards going bare. Lawrence’s food pantries are running short. (Lawrence Journal-World)

The beef next door. More Kansas ranchers are selling directly to consumers. (Wichita Eagle)

Tomato fest goes on. Salmonella scare doesn’t deter City Market festival. (KC Star)

Food safety tips. K-State’s got ‘em. (K-State)

→ No CommentsTags:

Drying mint a fragrant, painless process

July 7th, 2008 · Food preparation

On a recent foray to the backyard, I looked upon my mint and thought, “Behold! I could actually use this stuff for more than garnish!” And so I dried it. As previously promised, here is my report on drying mint.

Inspiration

I love the smell of fresh mint, and I have a small, contained patch of it next to the back steps. It gives up its scent as I brush past it, but it never occurred to me to do more than snip bits here and there to garnish fruit plates or flavor iced tea every now and then. All the discussion of food preservation, however, prompted me to look at that mint’s preservation potential. Hadn’t I paid $4 or more for not very much organic mint tea?

So I read up a little on drying mint, which means I read a lot of conflicting information. No matter, I figured. Usually, my mint simply went to seed, and I therefore had nothing to lose anyway, except a little time.

Harvest

There does seem to be consensus that the best time to cut herbs for drying is in the morning and just before they’re about to flower. My mint wasn’t quite at the flowering stage, but close enough. Using small garden pruners, I cut the mint to about a foot high and accumulated two big piles.

Wash and spin

I washed the mint reasonably thoroughly, I thought, then ran batches through the salad spinner. I laid them on towels on the kitchen counter to dry for a couple of hours. Wow, did the house smell great!

Bundle up

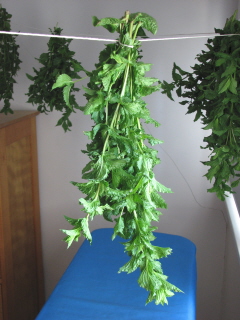
I gathered small bunches of mint stems into bundles which I tied with string. I thought I was exceedingly clever in fashioning slip knots every foot or so along a running piece of cotton string and inserting a bundle into each loop.

I then carried my bundled and tied mint to the only warm, dark, well-ventilated place I could think of—the bedroom. It has room-darkening shades, although its ventilation is a little wanting. (The basement is pretty dark, but nothing gets dry there.)

Hang to dry

After a couple of false starts, I got the mint stringers suspended from picture hanger to hinge to picture hanger and directed the oscillating fan in their direction. I thought it best to keep air moving until all the water from washing had dried. (In retrospect, I think the fan was unnecessary, but all the instructions I read cautioned that herbs would mold if there wasn’t enough air. I should have known it wasn’t a big deal, though, considering one such instruction called 68 degrees F (20 degrees C) “warm.” That may be warm for winter, but it’s practically frigid in these parts in the summertime.)

(It’s dark in there when I close the shades, which I did. Please note the ironing board. It doesn’t get much use, but I do own one.)

Wait

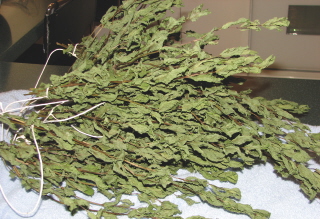
I waited. The mint withered and eventually became dry.

Second harvest

Eight days after I cut the mint, I took down the mint lines and stripped the leaves from the stems onto a clean kitchen towel.

Tip: Hold the tip of the stalk in one hand, and run your other hand down the stalk. The leaves will fall right off. If you go the other direction, trying to strip from the bottom up, you mostly flatten leaves. Whichever way you go, you’ll still have to pull the top leaves off one or two at a time.

Packing it in

The published advice encourages storing the leaves whole for greater retention of the oils that give the mint its flavor. Hence, I filled two quart mason jars and another jar I had on hand (capacity about 3 cups) with leaves, having the best luck by using a large cooking spoon for the transfer. I attached lids, and stuck the jars in a dark cabinet to wait until 68 degrees sounds warm to me. At that time, I intend to delight in brewing my own, organic free mint tea. (If you’re using this post as directions, you might want to check your jars for steam or any similar sign of moisture after the jars are closed an hour or two. I didn’t, because those leaves were crisp.)

Third harvest?

I have every reason to believe I’ll be able to cut and dry mint again before the season is over. I figure I’ve already dried enough to last me through the winter and then some. That gives me time to figure out whether any of my friends or family would be delighted with a gift of mint tea. You’ve been warned.

→ 22 CommentsTags:··

Independent, but community-minded, on the 4th

July 4th, 2008 · General

Fourth of July in my neighborhood has meant, for the past many years, a pure-Americana parade that ends, naturally, with refreshments. Neither the parade nor the refreshments are really the point, to my way of thinking. It’s much more about community and our individual ways of expressing our love of it. I’m glad to live in a place where young and old walk side by side, where lesbian couples and interethnic couples and WASPy couples and childless couples and singles all share in the pleasure of the community. So here, without further ado, is my photo tribute, such as it is, to my country and our occasionally abused freedoms.

(Note to RSS readers and email subscribers: You’ll need to go to the website to see the photos, if I’m not mistaken.)

→ 3 CommentsTags:···

Freezing cherries is as easy as pie

July 2nd, 2008 · Food preparation, local food

It’s been a bountiful year for sour cherries hereabouts, and I couldn’t help but notice that my neighbor’s cherry tree was still bursting with them despite being picked at by me, another neighbor, the owner neighbors and countless birds. So I picked some more—almost 2 pounds—after the tree owners said to pick as many as I wanted. This time, though, I didn’t have time to put them promptly into a pie. So I did the next best thing: I froze them.

By now I had perfected my paper-clip-pitting technique and made quick work of that task after I washed the cherries. (Note to potential cherry pitters: Wear an apron. Cherries are juicy, and the juice stains like crazy.) Then I placed the cherries on a large pan and placed them in the freezer.

Ready for the freezer

Frozen cherries and juice

Once frozen, I transferred the cherries to a freezer bag and sucked all the air I could out of it with a straw and the zipper closed around it (my low-tech alternative to a vacuum sealer). I placed that bag inside a second freezer bag. Now, they sit tantalizingly in my freezer. What will they be? Clafouti? Preserves? Hmm. I wonder what else I could make with sour cherries. Any suggestions?

An addendum, by the way. Don’t take my story as the last word (or even the first word) on freezing cherries. Some people swear by FruitFresh and other products to ward off browning. A little browning doesn’t bother me much (and really, there wasn’t much browning with these cherries when cooked or frozen right away). The extension service people also give directions for freezing with sugar or syrup, if you’re interested. I was interested in getting the job done, so I did it in the most expedient way for me.

→ 3 CommentsTags:··

On learning the joys of food preservation

June 30th, 2008 · Food preparation, local food

I’ve been reading Jennifer McMullen’s blog, “Rolling in the Dough,” for a while, and although Jennifer calls herself Baklava Queen (maybe you’ve seen her comments here), she’s also a food preservation and local food queen. Reading her blog has inspired me to try a little food preservation myself.

Food preservation doesn’t come naturally to me. Leftovers, yes. Preserving, no. Food preservation requires planning both in the preserving and eventual use of foods. Truth is, I’m a pretty lazy cook. That’s one reason I love summer produce. Besides being delicious, you can pretty much eat it without any preparation at all if you choose.

Food preservation, on the other hand, requires supplies. I don’t have supplies, as a rule. More important, you have to set aside time to prepare food that you aren’t going to eat for a very long time. That concept is not part of my food experience. Forget delayed gratification. I like to cook because I like to eat.

Jennifer, though, has nudged the inner Depression grandchild in me. My parents, both deeply affected by the Great Depression, were thrifty. Just the same, my mother, the chief cook, didn’t preserve food when I was growing up. I’m guessing that it was because she’d done far more canning than she’d ever wanted to when she was growing up on a farm in the Depression. Furthermore, I can think of few things more uncomfortable than spending hours tending to boiling water canners at the height of the hot, humid summers we have in eastern Kansas. After I’d left home, Mom took up freezing, but I never paid much attention.

Fast forward a couple of decades, and there little Ms. McMullen, whom I’ve never met but I suspect is 20 years younger than I am, is canning and freezing and heaven knows what else. I, meanwhile, have allowed really good local food to turn to goo in my refrigerator when I didn’t have time or didn’t know what to make with it. Yes, I compost such items, but it’s not the same.

The worst time for me, as a subscriber to Rolling Prairie Farmers Alliance, typically is in the spring when we get what seems like tons of green things: spinach, lettuce, mesclun, kale, chard, turnip greens, beet greens, herbs and then more spinach, lettuce, mesclun, and so on. Then I read Jennifer’s post about freezing greens. I sighed. I knew I had to do this. My mother would be appalled at my throwing food into the composter just because I hadn’t gotten around to doing something with it.

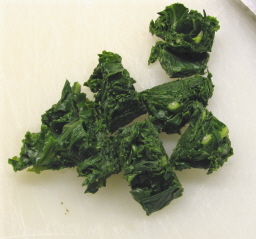
So I reread Jennifer’s post, read what they had to say at the National Center for Home Food Preservation, about freezing in general and about freezing greens in particular. Then I launched, blanching, squeezing, chopping and freezing what became two small packets of frozen greens, one kale and one beet greens.

blanched, chopped beet greens

blanched, chopped kale

Two tiny packets for freezing

Turns out it wasn’t too painful. So I decided to preserve more. I hacked off a bunch of my mint and dried it. I returned to my neighbor’s cherry tree and took nearly 2 pounds away from the birds. Then I pitted and froze those babies. I’ll give you details in the coming days. For the moment, though, congratulate me on my newfound preservation ethic. I don’t know how long I’ll keep it up, but it feels good so far. Still can’t envision the boiling-water canner, though.

Any preservationists out there? What’s your favorite kind of thing to preserve?

→ 3 CommentsTags:···